There are lots of things in the WordPress admin area that your users, authors, or clients don’t need to see or use. Cleaning up the admin area helps to keep them focused on only the options they need, without distracting clutter.
You can also hide menu items from the admin area, set user role permissions, and drag and drop menu items to organize your WordPress admin.
First, you’ll need to install and active the Admin Menu Editor plugin. For more details, please see our guide on how to install a WordPress plugin.
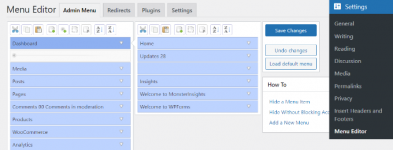
Upon activation, you can head over to Settings » Menu Editor from your WordPress dashboard. Next, you’ll see all your menu and submenu items under the ‘Admin Menu’ tab.

ou can simply drag and drop your menu items to rearrange their order. There are also options to remove or add new menu items.
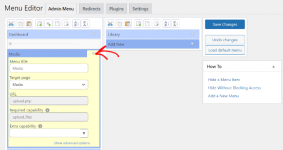
Next, go ahead and click the downwards arrow for any menu item to see more options. You can rename the menu title, change the target page, and more.

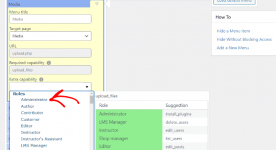
To hide a menu item for specific user, simply click the ‘Extra capability’ dropdown menu. After that, you can choose the user role who can view the menu item from the given options.
For example, let’s say you want to hide the Media menu and its submenus for all user roles except the administrator. To do that, simply click on the Extra capabilities dropdown menu and choose ‘Administrator’ under Roles.

Once you’re done, go ahead and save your changes.
Now the Media menu item will be visible to only the Administrator role and will be hidden to other user roles.
Hiding Menu Items from WordPress Admin
The easiest way to hide menus and items from the WordPress admin panel is by using the Admin Menu Editor plugin. It’s a free WordPress plugin that lets you change the menu titles, URLs, icons, and more.You can also hide menu items from the admin area, set user role permissions, and drag and drop menu items to organize your WordPress admin.
First, you’ll need to install and active the Admin Menu Editor plugin. For more details, please see our guide on how to install a WordPress plugin.
Upon activation, you can head over to Settings » Menu Editor from your WordPress dashboard. Next, you’ll see all your menu and submenu items under the ‘Admin Menu’ tab.

ou can simply drag and drop your menu items to rearrange their order. There are also options to remove or add new menu items.
Next, go ahead and click the downwards arrow for any menu item to see more options. You can rename the menu title, change the target page, and more.

To hide a menu item for specific user, simply click the ‘Extra capability’ dropdown menu. After that, you can choose the user role who can view the menu item from the given options.
For example, let’s say you want to hide the Media menu and its submenus for all user roles except the administrator. To do that, simply click on the Extra capabilities dropdown menu and choose ‘Administrator’ under Roles.

Once you’re done, go ahead and save your changes.
Now the Media menu item will be visible to only the Administrator role and will be hidden to other user roles.


